第19期_搭建系列_Windows Server 2008 服务器系统安装搭建FRP内网穿透笔记 EasyClick远程调试端口演示
1.frp_0.40.0
2.Windows Server 2008 服务器
注意 如果你的其他的系统 可以尝试用最新的版本进行操作 本次记录的就是2008的老系统进行搭建
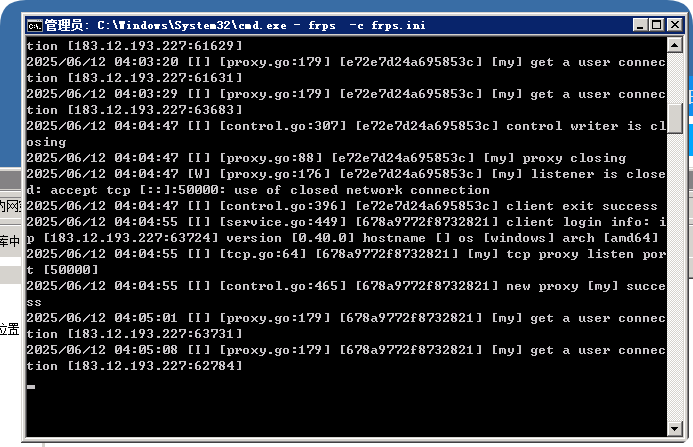
服务端成功截图:
初级测试模版服务端配置文件
[common]

bind_port = 7000
# 关键:兼容所有版本的禁用认证方式
# (1) 新版方式
authentication.enable = false
# (2) 旧版方式
authenticate = false文件夹路径上 直接敲cmd 然后出来cmd界面 输入对应的启动命令即可
或者直接启动我在对应文件夹里面放了的启动脚本 一键启动
------------------------------------------------------------------------------服务端启动
frps -c frps.ini
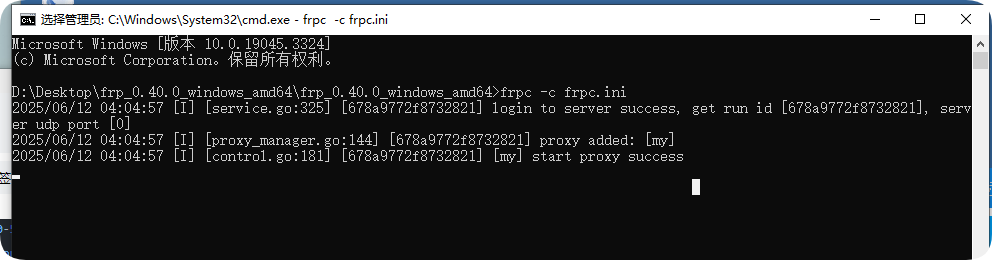
客户端成功截图:
初级测试模版客户端配置文件
[common]

server_addr = 160.202.224.52

server_port = 22709

authenticate = false

# ===== 服务配置 =====

[my]

type = tcp

local_ip = 192.168.3.65

local_port = 10826

remote_port = 50000
客户端启动
frpc -c frpc.ini
核心需要注意的是以下几点
1.对号入座,比如你的系统是2008的 你如果去找2020的系统做出来的教程 那么很容易出错.
2.尝试最简易的方式 不需要任何秘钥 初级配置 如果配置成功 那么就可以继续添加配置项目进去加强一下.
3.本地端口一定要测试开启状态 千万不要本地端口不开 就在启动客户端 那么多半都是报错的.
其他增强类配置笔记
# 限制IP访问

allow_ports = 50000-50100  # 只开放特定端口范围

authentication_timeout = 120  # 认证超时(秒)
# 启用Dashboard安全
dashboard_port = 7500
dashboard_user = admin
dashboard_pwd = Strong@Dashboard!2023
dashboard_tls_mode = true
# 连接限制
max_pool_count = 20
max_ports_per_client = 10 # 每个客户端最多10个端口
[common]

# ===== 核心安全配置 =====

server_addr = your_server_ip      # 替换为您的 FRP 服务器 IP/Domain

server_port = 7000                # 服务器端口(建议修改默认7000)

token = your_strong_token_here   # 使用强密码(建议32位随机字符)
# ===== 加密与认证加固 =====
tls_enable = true # 强制启用TLS加密
tls_cert_file = "" # 可选:指定客户端证书
tls_key_file = "" # 可选:指定客户端密钥
tls_trusted_ca_file = "" # 可选:指定可信CA证书
authenticate_heartbeats = true # 心跳包认证
authenticate_new_work_conns = true # 新工作连接认证
# ===== 连接加固 =====
protocol = tcp # 建议使用TCP协议(比kcp更安全)
tcp_mux = false # 禁用连接复用(增强安全性)
disable_custom_tls_first_byte = false # 强制使用标准TLS
# ===== 访问控制 =====
# (以下按需启用)
# admin_addr = 127.0.0.1 # 管理界面只监听本地
# admin_port = 7400 # 自定义管理端口
# admin_user = secure_admin # 管理用户名
# admin_pwd = Admin@Strong!Pwd2023 # 管理密码
# ===== 高级安全选项 =====
login_fail_exit = true # 登录失败时退出
max_pool_count = 5 # 限制连接池大小
heartbeat_interval = 30 # 心跳间隔(秒)
heartbeat_timeout = 90 # 心跳超时(秒)
disable_log_color = true # 禁用日志颜色(减少攻击面)
# ===== 随机高端口映射(避免端口扫描)=====
[secure_web]
type = tcp
local_ip = 192.168.x.x # 替换为您的内网IP
local_port = 80 # 本地服务端口
remote_port = 50000 # 公网端口(建议50000-60000随机高端口)
[secure_ssh]
type = tcp
local_ip = 127.0.0.1 # SSH 建议只绑定本地
local_port = 22
remote_port = 50001 # 另一个随机高端口
# ===== 安全TCP模式(推荐)=====
# (需要服务器和客户端同时配置)
#[secure_stcp]
#type = stcp
#sk = your_shared_secret_key # 客户端和服务端共享密钥
#local_ip = 192.168.x.x
#local_port = 3389
#use_encryption = true # 额外加密
#use_compression = true # 压缩数据(可选)
.
服务端配置 (frps.ini) - 双因素认证加强版
[common]

bind_port = 7000

token = server_main_token_here  # 主令牌认证(32位随机字符串)
# ===== 高级安全设置 =====
authentication_timeout = 90 # 缩短认证超时时间
authenticate_heartbeats = true # 心跳包需要认证
authenticate_new_work_conns = true # 新工作连接需要认证
allow_ports = 50000-50100 # 限制可映射端口范围
# 管理面板
dashboard_port = 7500
dashboard_user = security_admin
dashboard_pwd = Dashboard@Secur3!2023
dashboard_tls_cert_file = ./tls/cert.pem
dashboard_tls_key_file = ./tls/key.pem
# ===== 代理密钥配置 =====
[ssh_proxy]
type = auth
# 设置该代理的专用密钥
token = ssh_proxy_secret_k3y! # (与客户端对应)
[web_proxy]
type = auth
token = web_pr0xy_Secur1tyK3y # (与客户端对应)
客户端配置 (frpc.ini) - 双重认证加强版
[common]

server_addr = your_server_ip

server_port = 7000

token = server_main_token_here  # 与服务端一致的主令牌

tls_enable = true

login_fail_exit = true          # 认证失败时退出
# ===== SSH 代理(带代理密钥) =====
[secure_ssh]
type = tcp
token = ssh_proxy_secret_k3y! # 与服务端代理密钥一致
local_ip = 127.0.0.1 # 仅本地访问
local_port = 22
remote_port = 50000
use_encryption = true # 额外加密层
# ===== Web 代理(带代理密钥) =====
[secure_web]
type = tcp
token = web_pr0xy_Secur1tyK3y # 与服务端代理密钥一致
local_ip = 192.168.1.100
local_port = 80
remote_port = 50001
use_encryption = true
# ===== 安全心跳包 =====
[health_check]
type = tcp
local_ip = 127.0.0.1
local_port = 0
remote_port = 0
安全使用建议 ✅
- 最小端口开放原则:只映射必须的服务
- 定期更新:每季度更换 token 和端口
- 网络隔离:将需要映射的设备放在独立 VLAN
- 日志监控:定期检查 frpc 日志异常
- 服务限制:仅以普通用户权限运行 frpc
视频笔记地址
整理的资源包
我把我搭建成功的文件都进行整理打包 有需要的可以进行下载尝试安装搭建 .